
While messing around with a bunch of parts I purchased from Adafruit, I ended up building a solar powered Raspberry Pi.
The build is pretty simple once you get everything soldered on correctly.
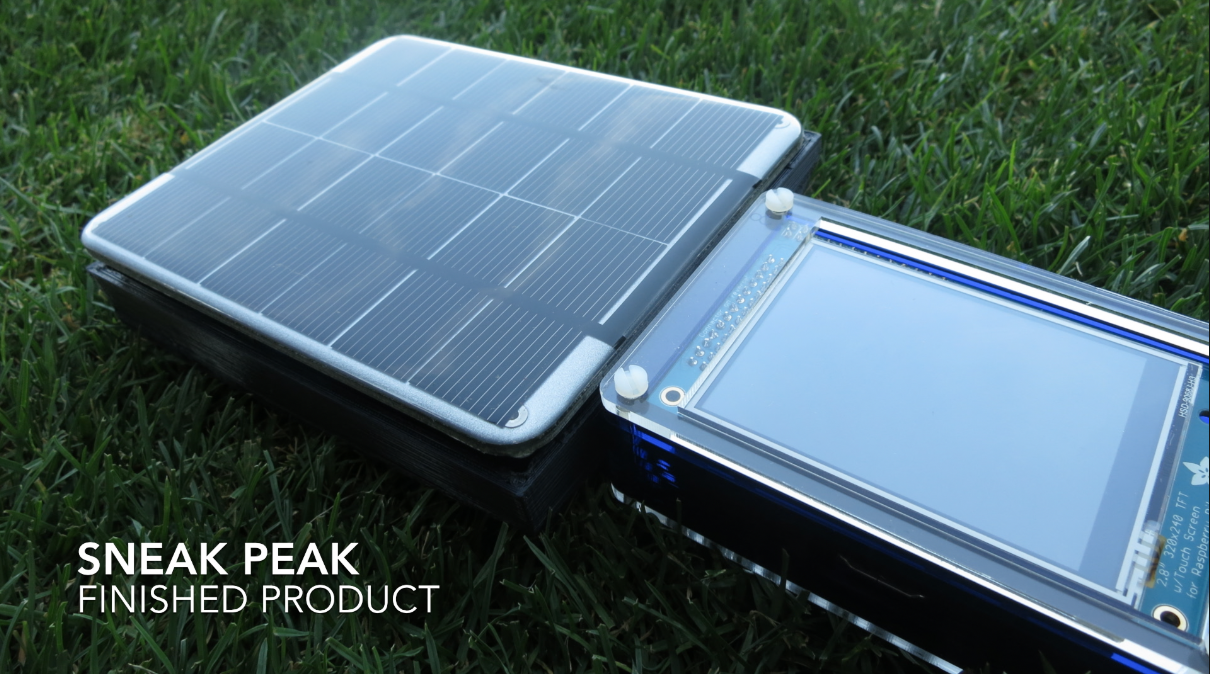
I’ll be following up this tutorial with another post detailing the ‘why’ behind this project, the final product design, as well as some really cool software I’m building to demo what this device is capable of.
To get started building your own solar powered Pi, check out the materials list below. Once you’ve got that down, watch the video for a step-by-step tutorial on how to put it all together.
*Note: this is not a full tutorial – there are several installation steps involved that I do not cover, but you can find existing tutorials on how to acomplish this on learn.adafruit.com.
Build List (Hardware):
Raspberry Pi: https://www.adafruit.com/products/998
Pi TFT 2.5’ Touchscreen: https://www.adafruit.com/products/1601
PiBow PiTFT Acrylic Case: https://www.adafruit.com/products/1723
8 GB SD Card w/ Noobs: https://www.adafruit.com/products/1583
Mini Wifi USB (802.11b/g/n): https://www.adafruit.com/products/814
Mini Wireless Keyboard w/ Touchpad: https://www.adafruit.com/products/922
Solar Panel (2W, 6V): https://www.adafruit.com/products/200
DC / LiPoly Charger: https://www.adafruit.com/products/390
LiPoly Battery (3.7V, 2500mAH): https://www.adafruit.com/products/328
DC Power Adapter (2.1mm): https://www.adafruit.com/products/369
Powerboost 500 (5v USB @ 500mA): https://www.adafruit.com/products/1903
How to Build:


Craig M
Jun 17, 2014 -
Great build, excited to see what it turns into Julian!
Dave Smith
Jun 20, 2014 -
Julian, that was really great. How long does the Pi run with the battery? Will it last the night?
Julian Sarokin
Jun 20, 2014 -
Great question!
Right now I’m finishing up the case that houses everything, but I think the next thing to test is battery duration. I have two different sizes of LiPoly batteries so we’ll see if either can get us through the night.
The smaller one is 3.7v 2500ma and the larger one is 3.7v 6600ma – both are converted to 5v via a booster (the model B Pi takes 5v at around 4-500ma).
Some paper napkin calculations would say that powering just the Pi alone on the 2500ma (smaller battery) we should get 4-5 hours (also depends if we have wifi attached, etc.).
The bigger battery would certainly get us through the night (based on those calculations), but the size is annoying to fit into a case. It could be possible to rig up 2 of the 2500ma batteries in some way to double the time.
Will keep you posted!
Antonio Huete
Jan 26, 2016 -
Hi Julian,
Were your tests conducted eventually? What are the results.
Great post. Thanks!
Antonio Huete
Daniel.Miller (@dalanmiller)
Jun 30, 2014 -
Why use a battery hungry touch screen if you’re going to power by solar?
Julian Sarokin
Jun 30, 2014 -
It mostly came down to a cost perspective – no touchscreen means the device needs to ship with a keyboard, which is an additional part + has it’s own charging issues.
So far it looks like the 2.8′ TFT doesn’t use that much juice – but I’m looking to switch to a 5″ tablet monitor which will probably require more power.
I guess for now it’s just a trade off – either bigger battery to accomidate the power hungry screen, or keyboard solution.
bob
Jun 6, 2018 -
Why not just VNC if you are connected to Wifi? No need for a keyboard, mouse, or screen
A Simple Revolution: My Techno Manifesto
Jul 14, 2014 -
[…] How-To: Build a Solar Powered Raspberry Pi […]
Jim
Aug 20, 2014 -
Great guide, thank you!
I am wondering if it would make sense to use the PowerBoost 1000 instead of the PowerBoost 500?
https://www.adafruit.com/products/2030
Thanks
A truly headless and wireless Raspberry Pi (with Mac OSX and an SDcard reader) | TinyLab
Sep 23, 2014 -
[…] need to plug my Pi into a wall or computer power source. This little detail will be eliminated once solar panel et al. arrive from Adafruit!*** I found myself in a precarious situation of late, having brought my Pi […]
adafruit_Support_rick
Sep 29, 2014 -
Julian – you really don’t want to connect the PowerBoost to the LOAD output of the Solar Lipo Charger, since the solar panel can produce up to 6V at the LOAD. That is too much for the PowerBoost. Instead, you should connect the PowerBoost to the BAT pad so that it only sees the battery voltage.
Julian Sarokin
Sep 29, 2014 -
Hey Rick!
Had no idea I wired this up wrong! Thanks for the tip. I’ll fix it up now :p
Markland
Oct 26, 2015 -
Hi Julian,
Can you explain the difference in the connect now given Rick’s suggestion. Even if its a sketch of the correct connection
Alexis
Nov 4, 2014 -
That is sooooo cool, what a wonderful world. Thanks for sharing.
I’m curious. Is the voltaic cell enough for powering the pi+wifi+screen or is it consuming battery in the meantime?
Tony K
Nov 5, 2014 -
Hi Alexis, I work at Voltaic. The solar panel used here only produces about 300 mA at 6V in direct sunlight (it’s the smallest panel we make) and a Raspberry Pi consumes about 600-1000 mA while running, therefore the main power source is the LiPo Battery while the panel slowly charges the battery.
Tony K
Nov 5, 2014 -
Minor description correction, the solar panel is actually a 2Watt 6Volt panel, not the other way around.
David Kimyagarov
Nov 24, 2014 -
Do you think you could upload the 3D model you printed for the solar panel, and also how to set up the touchscreen?
Julian Sarokin
Nov 24, 2014 -
Hey David,
Here’s the 3d model for the case https://tinkercad.com/things/bqH2CYSNtzs
The touchscreen is connected to the Pi itself, so you’ll need a screen that has touch capabilities.
David Kimyagarov
Nov 25, 2014 -
So I have the touchscreen, and you said in your video that you wrote some code for it to work and to display via the touchscreen?
Chris Wilkinson
Nov 30, 2014 -
Hi Julian. There was a comment above from Rick regarding plugging the PowerBoost into the BAT port instead of the LOAD port so that you avoid running 6v through the PowerBoost, but in this configuration, where would you put the battery itself? It surely can’t use the LOAD port instead? Seems dangerous. I want to try this out myself but the 6v panel problem is bugging me.
rick
Dec 1, 2014 -
The battery still goes in the battery port. However, there are two pads next to the battery port: B+ and GND. Connect wires from there to the PowerBoost.
Markland
Oct 26, 2015 -
Rick,
Am I understanding correctly that the connection from the Battery to the PowerBoost would now only be to the B+ and GND connection, Therefore no connection to the LOAD port?
Rick
Dec 2, 2015 -
The LBO pin reports the battery voltage until it goes too low and the pin shuts off.
Rick
Dec 2, 2015 -
Correct. No connection to LOAD.
Danny Martin
Apr 27, 2016 -
Rick if I am using a Powerboost 1000c and the same USB / DC / Solar Lithium Ion/Polymer charger – v2, where do I connect the wires coming from the B+ and GND to the Powerboost 1000c?
Rick
Dec 30, 2016 -
Connect to the BAT and GND pins on the PB1000C
mladencucak
Dec 12, 2014 -
Hi Julian,
Great project, love the neat package! Could you help me with the choice of solar panel and batteries? I am trying to make automated insect trap. It would be be placed outdoor and would take one photo a day and send it through GPRS, so RPi and GPRS module. tnx…
Tony K
Dec 15, 2014 -
you’ll need to know how much power your system consumes on a daily basis. Find out how many watts it uses then multiply by 24 to get the overall watt-hours select a battery that’s at least twice this big so that you can get through a full day of rain/clouds on the battery alone. Then select a solar panel that’s about 5-10X larger than the wattage you need. So if your system runs at 5V and draws 200mA consistently, that’s 1W so pick a panel that’s 5-10W.
boutsism
Jan 6, 2015 -
Julian have u checked how many hours your project can keep your pi working in a winter day with the 2500mAh battery?
Ryan
Feb 13, 2015 -
I’m also curious as to how long your Pi will run on the battery.
First Milestone: 100,000 Strong
Mar 9, 2015 -
[…] How to Build a Solar Powered Raspberry Pi […]
A Internet das Coisas (IoT) e a Internet nas Coisas | Bucky Bits
Mar 18, 2015 -
[…] Como construir um Raspberry Pi a energia solar […]
Alex
Oct 21, 2015 -
Is there a way to measure the output voltage in order to estimate remaining time of the battery ?
Rick
Dec 2, 2015 -
The LBO pin reports the battery voltage until it goes too low and the pin shuts off.